There are no specific requirements for the host software to transition from RepRap X2 to X2V3.
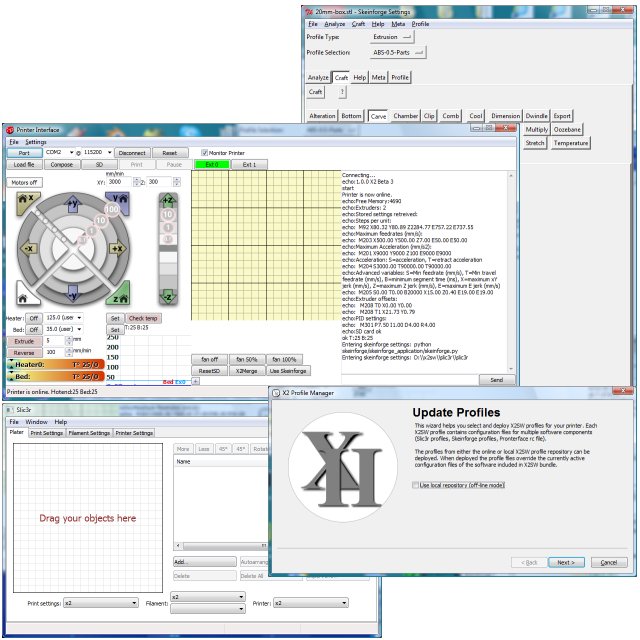
The latest versions of X2SW Software Bundle
will work for both X2 and X2V3 as well as usual single extruder printers. Starting with the version 1.1.0.7 the RepRap X2V3 profiles are
bundled with the installer. It is however recommended to upgrade to the latest version to realize all the benefits of the dual extrusion printing.
The latest profiles can always be loaded using X2SW profile manager
from the online repository (chose under "RepRap/X2V3" branch in the profile tree). The X2SW profiles contain in itself the configuration of the printer UI and
various slicing profiles for Skeinforge and Slic3r slicers bundled with the software package. As the new profiles get published the announcements are
posted on the forum pages of the web site.
Slic3r
Here is the list of the Slic3r slicing profiles available at the moment:
Printer Settings:
x2v3 - dual extruder setup, use for printing with one extruder, pick which one before starting the print;
x2v3-double - duplicate mode, configuration to print the same object with both extruders;
x2v3-mirror - mirror mode, configuration where second extruder prints the mirrored version of the object;
x2v3-multi - dual extruder setup, use for multi-color or any other mode where extruders change during the print.
Filament Configurations:
abs-3mm - for printing ABS 2.85mm filament;
pla-3mm - for printing PLA 2.85mm filament;
n-vent-3mm - for printing Taulman N-Vent 2.85mm filament;
t-glaze-3mm - for printing Taulman T-Glase 2.85mm filament;
alloy-910-3mm - for printing Taulman Alloy-910 2.85mm filament.
Print Settings:
0.2mm-50 - for printing with 0.2mm layer height at 50mm/sec (recommended for all but Alloy-910);
0.1mm-50 - for printing with 0.1mm layer hight at 50mm/sec (for smooth walls);
0.2mm-40 - for printing with 0.2mm layer height at 40mm/sec (recommended for Alloy-910);
0.2mm-30 - for printing with 0.2mm layer height at 30mm/sec (high quality);
*-sparse - the same as the base profiles, but low density infill and less perimeters for faster test prints.
How to Print
For the single extruder printing use "x2v3" Printer Settings configuration. You can check and/or modify all the Slic3r slicing
settings by going to "Settings->Slicing settings" from the Pronterface UI. The "File->Open" menu item brings up the file
selector dialog where an STL or G-code file can be picked. If the STL file is selected it is automatically sliced and the
generated G-code is loaded. If a G-code (*.g) file is selected the G-code is loded as is. The dual and mirror printing
works similarly, but requires chosing "x2v3-double" or "x2v3-mirror" Printer Settings configuration in the Slic3r slicing settings
and preparing both extruders for the print.
If you like to use the dual extruder capabilities for printing support, infill or various parts of the object
in different materials or colors use the "x2v3-multi" printer profile. The choice of extruder for perimeter, infill or support
material can be changed under the "Print Settings"->"Multiple Extruders" tab.
If printing an object combined of two different colors or materials you will need two, primary and secondary, STL files (for primary
material or color, and secondary material or color). The STLs have to be manifold and at the coordinates placing them at the right
position against each other. The slicing has to be done using Slic3r plater window (click "S3rPlater" button to bring it up).
When it is brought up go to "Plater" tab and click "Add..." button to add the primary STL. After adding the primary STL click the
"Settings..." button (on the right from "Add..."). Chose the extruder 1 on the "Parts" tab of the popped up window and click
"Load part..." button to load the secondary STL. Chose the extruder 2 when the secondary part is loaded. Note that the object
is now consists of 2 parts and you can select each part and examine and/or add the part specific printing settings.
When done, click "Ok", then click "Export G-code" and wait till slicing is finished (you will see the slicing status in the status
bar at the bottom of the plater window). When complete close the plater window. The pronterface will load the G-code file
automatically and you should see the extrusions paths for different extruders in different colors in the preview window.
After the G-code is loaded (for either dual or single extruder prints) prepare the extruder(s) by setting their and
the bed temperatures. Use the "Extrude" button to try extruding a few millimeters of the filament to verify the printer operation.
The "Tool:" choice button allows to pick the active extruder to send the commands to. If printing with single extruder leave the
one you want to print with active. When ready press the "Print" button at the top of the window to start the
printing.
Skeinforge
Here is the list of the Skeinforge slicing profiles available at the moment:
ABS-0.35-Parts - printing ABS, one extruder
ABS-0.35C-BASE - printing ABS, dual material, extruder 0 part of the object
ABS-0.35C-INSERT - printing ABS, dual material, extruder 1 part of the object
ABS-0.35S-Parts - printing ABS, extruder 0 w/ HIPS support from extruder 1
PLA-0.35-Parts - printing PLA, one extruder
PLA-0.35C-BASE - printing PLA, dual material, extruder 0 part of the object
PLA-0.35C-INSERT - printing PLA, dual material, extruder 1 part of the object
In order to choose a profile go to "Settings->Slicer Settings" and pick the desired profile in the
"Profile Selection" drop-down box. Then slice the model by opening its STL file in the Pronterface UI.
After slicing is finished (might take a while for complex objects) it's ready to be printed.
ABS-0.35-Parts
This is a standard single extruder ABS printing profile.
How to print:
Select the extruder to print from
(by pressing the "0" or "1" "Tool:" selector button on the left bottom side of the Pronterface UI window;
Set the heater temperature
(depending on your ABS supplier it can vary, usually within 210-235C range);
Set the bed temperature
(100-115C, takes a while to reach 115C, but might help to prevent warping,
set the bed temperature before starting the slicing to save time);
Wait till temperatures get within a degree or 2 of the target values;
Start printing by clicking the "Print" button.
ABS-0.35C-BASE and ABS-0.35C-INSERT
These profiles should be used together. The model has to be represented by 2 STL files.
The first one will be printed with material loaded into extruder 0. The second will be printed using extruder 1.
The second material can be ABS of different color or HIPS for printing manually generated support. The profile
can be tweaked to work better with other than normal ABS or HIPS materials. For example it can be a conductive
plastic or plastic with different properties for improving the final object flexibility or strength.
The example of printing ABS inside HIPS support can be seen in the beginning of the video here
https://www.youtube.com/watch?v=AEW-DNo0GxI.
How to print:
Slice the first STL using "BASE" profile;
Switch to the "INSERT" profile and slice the second STL;
Click X2Merge button to bring up the merge tool dialog;
Choose the penultimate G-code file produced by "BASE" slicing for "Base penultimate gcode";
Choose the penultimate G-code file produced by "INSERT" slicing for "Insert penultimate gcode";
Enter "abs_c_on_x2v3.gcode" into "Ext 1 On gcode" box;
Enter "abs_c_off_x2v3.gcode" into "Ext 1 Off gcode" box;
Click "Generate and Load" button, if successful the mixed G-code instructions will be loaded by UI;
Select extruder 0 and set its hotend printing temperature;
Select extruder 1 and set its hotend printing temperature;
Set bed temperature;
Switch back to extruder 0 and wait till the target temperatures are reached;
Start printing by clicking the "Print" button.
ABS-0.35D-Parts
This profile is for printing in ABS. It prints the same object from both extruders simultaneously.
It's done by making the extruder 1 motors copying the steps made by extruder 0. The extruders have
to be identical and use identical filament to achieve good results.
The printing volume is reduced to 100mm on the X axis when this profile is in use.
How to print:
Select extruder 0 and set its hotend printing temperature;
Select extruder 1 and set its hotend printing temperature;
Set the bed temperature;
Switch back to extruder 0 and wait till the temperatures get close to the target values;
Start printing by clicking the "Print" button.
ABS-0.35DM-Parts
This profile is for printing in ABS. It prints the mirrored copy of the object from the second extruder.
It's done by making the extruder 1 motors copying the steps made by extruder 0 but some of them in
opposite direction. The extruders have to be identical and use identical filament to achieve good results.
The printing volume is reduced to 77mm on the X axis when this profile is in use. The example of printing
two symmetrical parts for X2V3 machine using this profile is shown in the following video
https://www.youtube.com/watch?v=9c2cHfZs8kg.
How to print:
Select extruder 0 and set its hotend printing temperature;
Select extruder 1 and set its hotend printing temperature;
Set the bed temperature;
Switch back to extruder 0 and wait till the temperatures get close to the target values;
Start printing by clicking the "Print" button.
ABS-0.35S-Parts
This profile is for printing in ABS from extruder 0 with Skeinforge generated support printed in HIPS from extruder 1.
The example is the model of a cat shown in about 2 minutes from the start of the video here
https://www.youtube.com/watch?v=AEW-DNo0GxI.
Skeinforge uses the same settings to generate G-code for printing the object and the support structures. Therefore, the filament of identical
diameter has to be used in both extruders.
How to print:
Select extruder 0 and set its hotend printing temperature;
Select extruder 1 and set its hotend printing temperature;
Set the bed temperature;
Switch back to extruder 0 and wait till the temperatures get close to the target values;
Start printing by clicking the "Print" button.
PLA-0.35-Parts
This is a standard single extruder PLA printing profile.
How to print:
Select the extruder to print from
(by pressing the "Ext 0" or "Ext 1" button on top of the Pronterface UI window);
Set the heater temperature
(depending on PLA used it can vary, usually within 175-200C range);
Set the bed temperature
(75-85C, you can set the bed temperature before starting the slicing to save time);
Wait till temperatures get within a degree or 2 of the target values;
Start printing by clicking the "Print" button.
PLA-0.35C-BASE and PLA-0.35C-INSERT
Just like their ABS counterparts these profiles should be used together. The procedure is exactly the same.
The profile is usually used for printing in PLA of different colors, but can be used for other material mixes
with minor tweaking. The example of the dual color medallion printed using this profile can be seen at the end of the video here
https://www.youtube.com/watch?v=AEW-DNo0GxI.
How to print:
Slice the first STL using the "BASE" profile;
Switch to the "INSERT" profile and slice the second STL;
Click X2Merge button to bring up the merge tool dialog;
Choose the penultimate G-code file produced by "BASE" slicing for "Base penultimate gcode";
Choose the penultimate G-code file produced by "INSERT" slicing for "Insert penultimate gcode";
Enter "pla_c_on_x2v3.gcode" into "Ext 1 On gcode" box;
Enter "pla_c_off_x2v3.gcode" into "Ext 1 Off gcode" box;
Click "Generate and Load" button, if successful the mixed G-code instructions will be loaded by UI;
Select extruder 0 and set its hotend printing temperature;
Select extruder 1 and set its hotend printing temperature;
Set bed temperature;
Switch back to extruder 0 and wait till the target temperatures are reached;